点击右侧+展开内容所需要用到的文件
README.md
gen12_igd.rom和IntelGopDriver-github.rom是qz Gand大佬的IGD项目https://github.com/gangqizai/igd
对应的参数是:
hostpci0: 0000:00:02.0,legacy-igd=1,romfile=gen12_igd.rom
hostpci1: 0000:00:1f.3,romfile=IntelGopDriver-github.rom
参考视频:https://www.bilibili.com/video/BV1A94y1p7X6
安装pve过程略过,安装完pve后强烈推荐local-lvm与local空间合并(空间低踩过的坑)
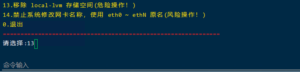
使用pve_source工具,移除local-lvm,这会删除local-lvm中所有的虚拟机文件,然后在数据中心-存储0移除local-lvm,把原来local-lvm内容合并在local中
直通设置,在pve-shell下引导文件新添加参数intel_iommu=on" initcall_blacklist=sysfb_ini
按ctrl+x,输入y,回车保存并退出
nano /etc/default/grub

GRUB_DEFAULT=0
GRUB_TIMEOUT=5
GRUB_DISTRIBUTOR=`lsb_release -i -s 2> /dev/null || echo Debian`
#GRUB_CMDLINE_LINUX_DEFAULT="quiet"
GRUB_CMDLINE_LINUX_DEFAULT="quiet intel_iommu=on" initcall_blacklist=sysfb_init
GRUB_CMDLINE_LINUX=""
编辑设备黑名单
nano /etc/modprobe.d/pve-blacklist.conf

# This file contains a list of modules which are not supported by Proxmox VE

# nvidiafb see bugreport https://bugzilla.proxmox.com/show_bug.cgi?id=701
blacklist nvidiafb
blacklist amdgpu
blacklist i915
blacklist snd_hda_intel
options vfio_iommu_type1 allow_unsafe_interrupts=1
重启pve
reboot
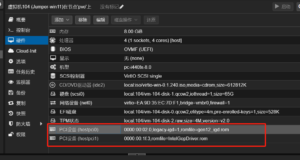
查看核心PCI ID,确认0000:00:02.0是核显设备,0000:00:1f.3为音频设备
root@pve:~# lspci -D -nn
0000:00:00.0 Host bridge [0600]: Intel Corporation Device [8086:4e24]
0000:00:02.0 VGA compatible controller [0300]: Intel Corporation JasperLake [UHD Graphics] [8086:4e61] (rev 01)
0000:00:04.0 Signal processing controller [1180]: Intel Corporation Dynamic Tuning service [8086:4e03]
0000:00:14.0 USB controller [0c03]: Intel Corporation Device [8086:4ded] (rev 01)
0000:00:14.2 RAM memory [0500]: Intel Corporation Device [8086:4def] (rev 01)
0000:00:16.0 Communication controller [0780]: Intel Corporation Management Engine Interface [8086:4de0] (rev 01)
0000:00:17.0 SATA controller [0106]: Intel Corporation Device [8086:4dd3] (rev 01)
0000:00:1c.0 PCI bridge [0604]: Intel Corporation Device [8086:4dbc] (rev 01)
0000:00:1c.5 PCI bridge [0604]: Intel Corporation Device [8086:4dbd] (rev 01)
0000:00:1c.6 PCI bridge [0604]: Intel Corporation Device [8086:4dbe] (rev 01)
0000:00:1c.7 PCI bridge [0604]: Intel Corporation Device [8086:4dbf] (rev 01)
0000:00:1f.0 ISA bridge [0601]: Intel Corporation Device [8086:4d87] (rev 01)
0000:00:1f.3 Audio device [0403]: Intel Corporation Jasper Lake HD Audio [8086:4dc8] (rev 01)
0000:00:1f.4 SMBus [0c05]: Intel Corporation Jasper Lake SMBus [8086:4da3] (rev 01)
0000:00:1f.5 Serial bus controller [0c80]: Intel Corporation Jasper Lake SPI Controller [8086:4da4] (rev 01)
0000:01:00.0 Ethernet controller [0200]: Intel Corporation Ethernet Controller I226-V [8086:125c] (rev 04)
0000:02:00.0 Ethernet controller [0200]: Intel Corporation Ethernet Controller I226-V [8086:125c] (rev 04)
0000:03:00.0 Ethernet controller [0200]: Intel Corporation Ethernet Controller I226-V [8086:125c] (rev 04)
0000:04:00.0 Ethernet controller [0200]: Intel Corporation Ethernet Controller I226-V [8086:125c] (rev 04)
下载win11镜像并安装,需要注意的地方有:
下载最新virto-win驱动,安装时加载才能识别virto设备;注意使用uefi引导,添加efi磁盘,添加TMP安全启动;CPU选择host;
创建完毕后,安装系统,并安装virto所有驱动程序,配置网络,配置mstsc远程桌面
完成远程桌面后,关闭虚拟机
添加虚拟机硬件,把显卡和声卡设备直通进虚拟机,虚拟机自带显示选择"无"
将gen12_igd.rom和IntelGopDriver.rom上传到pve目录/usr/share/kvm,文件在文章最顶端可下载
编辑虚拟机,在pve-shell输入:
nano /etc/pve/qemu-server/104.conf
其中104.conf为虚拟机编号
编辑下列关键参数,注意文件名与你上传的文件名一致,gen12_igd.rom对应的hostpci0: 0000:00:02.0显卡,IntelGopDriver.rom对应的是hostpci1: 0000:00:1f.3声卡设备
在文件第一行输入args: -set device.hostpci0.addr=02.0 -set device.hostpci0.x-igd-gms=0x2 -set device.hostpci0.x-igd-opregion=on
hostpci0: 0000:00:02.0,legacy-igd=1,romfile=gen12_igd.rom
hostpci1: 0000:00:1f.3,romfile=IntelGopDriver.rom
保存后可启动虚拟机,此时dp口应有画面输出
下载驱动2125驱动可完成安装